Tangra AI Photo Editor
Restore, enhance, and reimagine your photos with AI in 3 simple steps.
Overview
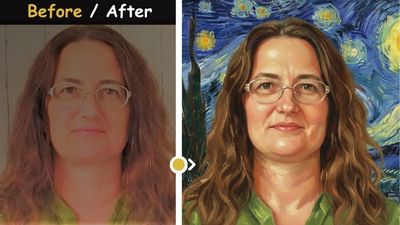
Tangra AI Photo Editor is an app that restores old or damaged photos and transforms any photo using natural-language AI prompts. You upload a picture, pick a quick prompt or type your own instruction, choose an AI quality tier, and the app returns an enhanced image you can view, download, share, or keep editing. It covers photo restoration (de-blur, de-spot, sharpen, colorize), creative transforms (younger/older, superhero, time travel), artistic styles (Ghibli, oil painting, watercolor, pop art), and targeted edits (change background, add/remove/replace objects, professional headshots).
Who it’s for
- People restoring old, faded, scratched, or black-and-white family photos to preserve memories
- Anyone who wants to colorize or sharpen vintage photographs
- Casual users who want fun AI photo transforms (superhero, time travel, with celebrities, younger/older)
- Hobbyists turning photos into artistic styles like Studio Ghibli, oil painting, watercolor, or pop art
- Users who need quick targeted edits: swap a background, add or remove objects, or generate a professional headshot
- Mobile and desktop users who want a simple, prompt-driven editor without learning complex photo software
Key features
AI photo restoration
One-tap restoration prompts remove blur, spots and cracks, sharpen details, and add realistic color while preserving facial features and original details. Quick options include Full Restoration, Remove Spots, Fix Sharpness, and Add Color.
Natural-language AI editing
An always-editable prompt box lets you describe any change in plain English (e.g. 'Change the background to a glowing beach sunset'). Quick-prompt buttons pre-fill the text, and you can freely edit it before transforming.
Quick prompts
Prompts are organized into tabs: Restoration (restore/de-spot/sharpen/colorize), Portraits (professional headshots/younger/older), Fun (with celebrities, superhero, time traveler, fantasy world), Art (Ghibli, pencil, oil painting, watercolor, pop art, impressionist), and Edits (background, change, add, remove, replace, reposition).
Three AI quality tiers
Choose Light, Smart, or Genius models per transform. Higher tiers produce higher-quality results at a higher credit cost. Smart is the default.
Flexible upload options
Add a photo by dragging and dropping, choosing a file from disk, pasting from the clipboard, scanning a QR code to upload from your phone, or picking from your existing Tangra image gallery.
Continue editing and iterate
After a transform you can feed the result straight back in as the new input with 'Continue Editing' to stack edits, or restart with a fresh upload.
View, download & share results
Open the result full-screen with zoom, download it to your device, or generate a share link to send to friends and family (with native share sheet on supported devices).
How to use it — step by step
- Open the Photo EditorGo to https://tangra.link/photos (or open the app). You'll see the Tangra AI Photo Editor with a 3-step progress bar: Upload, Enhance, Share.
- Log inSign in with the passwordless email login to unlock editing. Your account, subscription, and credits are shared across the Tangra AI website and apps.
- Upload your photo (Step 1)In the upload box, drag and drop your photo, click to select a file from disk, paste from the clipboard, scan the QR code to send a photo from your phone, or pick an image from your gallery. Accepted formats: JPEG, PNG, WEBP, HEIC, and JFIF, up to 30MB.
- Choose a prompt or write your own (Step 2 - Enhance)Pick a category tab (Restoration, Fun, Art, or Edits) and tap a quick-prompt button to pre-fill the prompt, or type your own instruction in the prompt box describing exactly how you want the photo changed.
- Pick an AI quality tierSelect Light, Smart, or Genius below the prompt. Smart is selected by default; Genius gives the highest quality. Each tier shows its credit cost.
- Transform the photoClick 'Transform Photo' (the button shows the credit cost). The app processes your image with a live progress bar.
- Review the result (Step 3 - Share)When processing finishes, the enhanced photo appears. Click it to open full-screen with zoom and download it, share it via link, choose 'Continue Editing' to refine further, or open 'My Photos' to return to your gallery.
See it in action
Screens you’ll work with inside Photo Editor:

The 'Tangra AI Photo Editor' hero with the tutorial video player, 'Log in to create' button, Microsoft Store badge, and client reviews — the marketing entry state before login.

The editor header showing the Upload → Enhance → Share progress bar and the passwordless login form, conveying the simple 3-step flow.
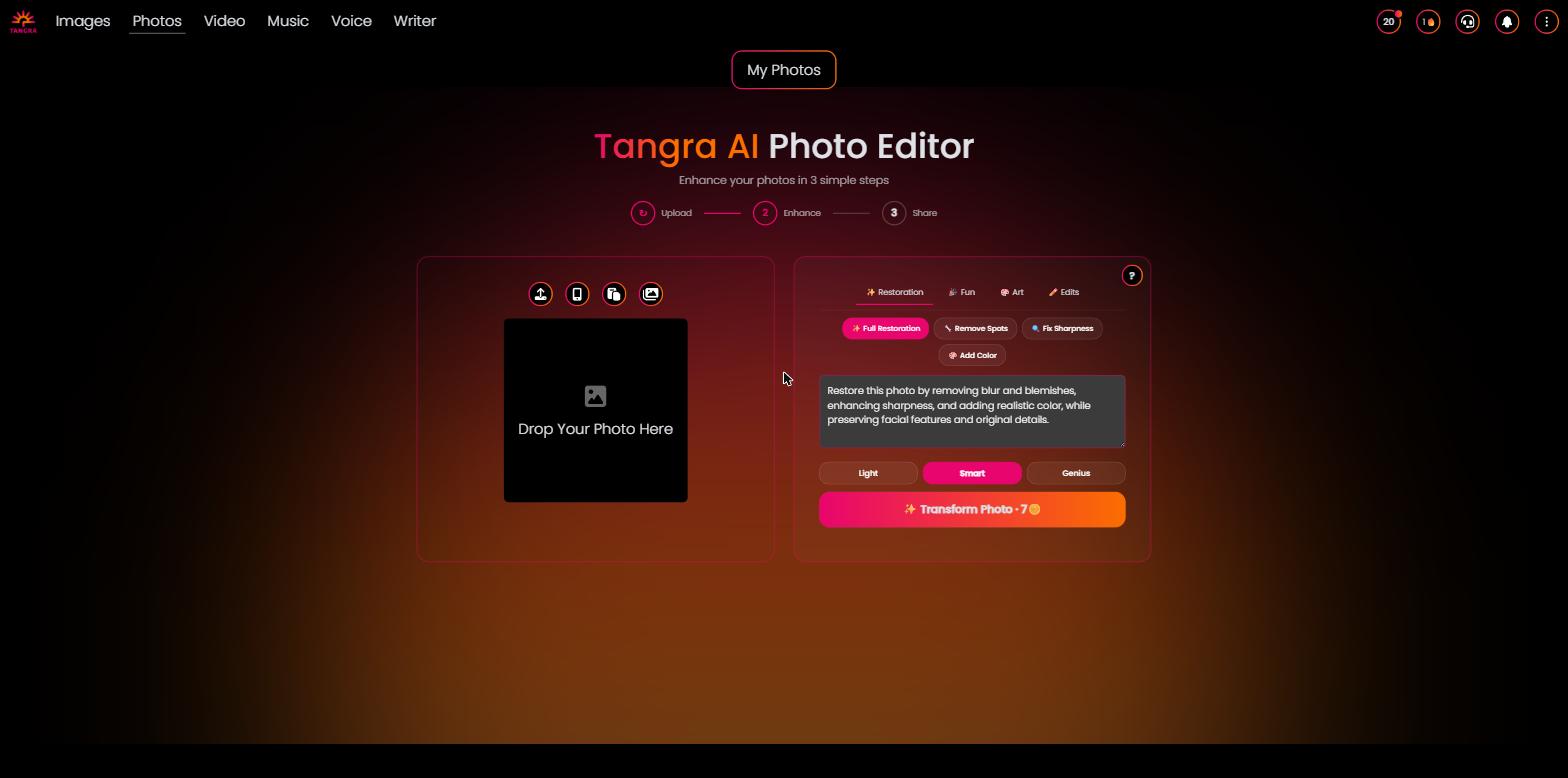
The two-column working editor: the upload drop zone on the left with disk/phone-QR/clipboard/gallery buttons and 'Drop Your Photo Here', and the dimmed enhancement panel on the right.

An uploaded photo on the left and the active enhancement panel on the right showing the Restoration/Fun/Art/Edits category tabs, quick-prompt chips, the custom prompt box, the Light/Smart/Genius model selector, and the 'Transform Photo' button.

The finished restored/transformed photo with 'Share with Friends & Family', 'Continue Editing', and 'My Photos' buttons; clicking the image opens the full-screen zoom and download controls.
Settings & controls
Every control in Photo Editor, what it does and the options available:
| Control | What it does | Options |
|---|---|---|
| Category tabs | Switch between prompt groups; selecting a tab loads that category's first prompt into the prompt box. | Restoration, Portraits, Fun, Art, Edits |
| Quick-prompt buttons | One-tap presets that fill the prompt text. Examples: Full Restoration, Remove Spots, Fix Sharpness, Add Color, With Celebrities, As a Superhero, Younger, Older, Time Traveler, Fantasy World, Ghibli Style, Oil Painting, Watercolor, Pop Art, Change Background, Add, Remove, Replace, Reposition. | Prompt presets |
| Custom prompt box | Editable text area where you describe the desired edit; typing here switches the selection to a custom prompt. | Free text |
| AI model / quality tier selector | Chooses the model used for the transform; higher tiers cost more credits and yield higher quality. | Light, Smart (default), Genius |
| Transform Photo button | Runs the AI edit on the uploaded photo using the current prompt and tier; displays the credit cost. | Enabled when a prompt is present |
| Upload source buttons | Controls for adding the source photo. | Upload from disk, Upload from phone (QR), Paste from clipboard, Choose from gallery, Drag-and-drop |
| Step progress bar | Shows and lets you jump between the three stages; the reset/restart control returns you to Upload with a fresh photo. | 1 Upload, 2 Enhance, 3 Share |
| Result actions | Actions available after a transform completes. | Open full-screen/zoom, Download, Share with Friends & Family, Continue Editing, My Photos |
AI models
Photo Editor lets you pick from a curated lineup of AI models — each shows its credit cost in the app. Available models:
Outputs & formats
- Enhanced/restored image returned as a PNG download
- High-resolution output (Smart and Genius tiers scale resolution/detail)
- Full-screen zoomable preview of the result
- Shareable link in the form https://tangra.link/images/<shareLink>
- Private images saved to your 'My Photos' gallery